Choosing the right Machine Safety Guard begins with understanding the task, not browsing product catalogs. Each machine presents different hazards, from rotating shafts and pinch points to flying chips and hot surfaces. A practical selection starts with a careful review of how operators load, adjust, clean, and maintain the equipment. Observe the work in progress. Ask where hands travel and when access is genuinely needed. These details help determine whether a fixed barrier, movable guard, or monitored access system fits the application.
Next, consider the guard’s construction and everyday use. A steel mesh panel may offer visibility and resist impact, while a solid panel can help contain debris. Check clearances, mounting points, door movement, and the space available around the machine. If the guard includes an interlock, confirm that it suits the machine’s control system and intended access pattern. Do not treat a component’s label as proof that the complete installation is suitable. Review manufacturer documentation, installation guidance, and relevant workplace requirements with a qualified safety professional.
Maintenance deserves attention, too. A guard that blocks routine inspection may be removed or bypassed under production pressure. That risk is easy to overlook. Choose a design that supports safe servicing, allows practical cleaning, and makes damage visible. Then verify the installation under real operating conditions, including normal material handling and foreseeable adjustments. No single guard solves every hazard, and a tidy checklist cannot capture every shop-floor habit. Careful assessment, informed advice, and periodic review provide a stronger basis for choosing a Machine Safety Guard that protects people without obstructing essential work.
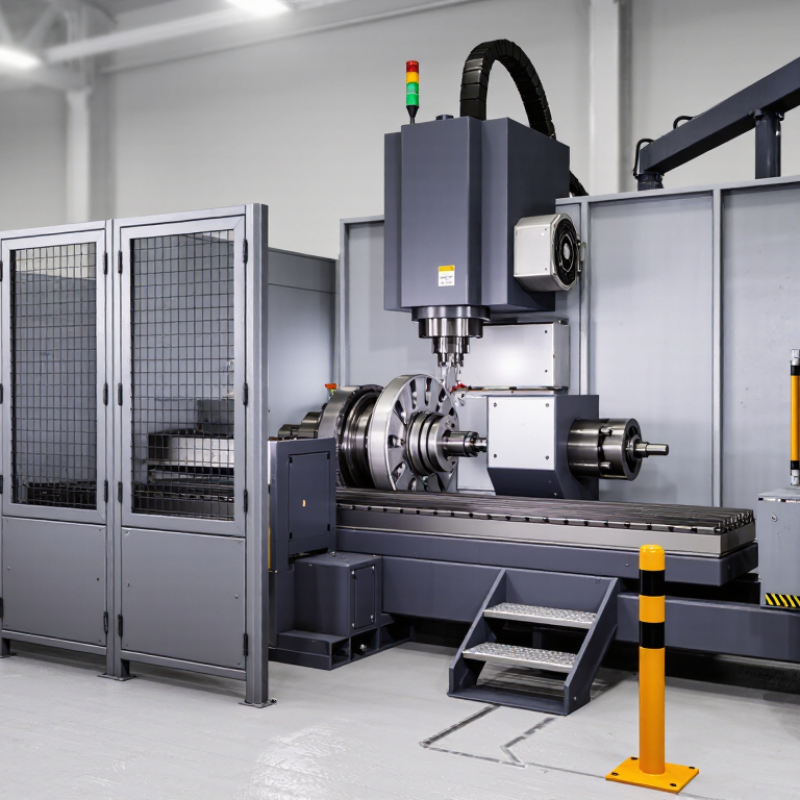
Choosing the right machine safety guard starts with observing the machine during real work, not just while it sits idle. Watch each cycle from a safe position. Note moving parts, exposed belts, pinch points, hot surfaces, flying chips, and areas where material can snag. A hazard may appear only when a door opens or a jam is cleared. Record where hands, tools, and materials travel.
Access needs matter as much as the hazard itself. Identify routine tasks, such as loading stock, checking a gauge, cleaning, and changing components. A fixed guard may suit areas rarely accessed, while an interlocked access point may be more practical for frequent adjustments. Check sightlines, reach distance, and whether the guard obstructs controls or emergency stops. One detail is easy to miss: workers may create an awkward reach if a guard blocks the normal loading path. Revisit the layout with operators. Their workarounds can reveal design flaws, though their feedback may not capture every risk.
Tips: Map each task to the hazard it exposes. Test access with the machine stopped, and confirm visibility from the operator’s position. Keep the assessment specific. A quick sketch can help, but it may miss a short task performed only once per shift.
Fixed guards work well around gears, belts, and pinch points that rarely need adjustment. A bolted steel cover can block access without interrupting production. Its weakness is practical: if cleaning requires frequent removal, workers may leave it off.
That happens.
Interlocked guards allow access for setup or jam clearing, then stop hazardous motion when opened. They suit tasks requiring frequent entry, but switches, hinges, and alignment need regular inspection. A guard that closes but fails to signal correctly is not protective.
Not always.
Adjustable guards can fit different stock sizes, but poorly set gaps may leave hands exposed. Perimeter fencing separates people from larger automated cells; it needs secure access gates and enough room for safe maintenance. Light curtains allow material to pass through, but their detection zones and stopping distances require careful assessment. A small tooling change can alter the risk. Consider how operators load parts, clean spills, and respond to jams—not only the machine’s normal cycle.
That detail is easy to miss.
Before selecting a machine guard, identify the rules that apply where the equipment will operate. In the United States, OSHA’s 29 CFR 1910.212 requires guarding against hazards such as rotating parts, points of operation, and flying chips. It does not prescribe one universal guard design. A fixed barrier that works on a slow conveyor may obstruct safe loading at a press. Check access, cleaning, adjustment, and maintenance tasks at the machine itself.
Use risk-assessment standards to guide the details. ISO 12100 outlines machinery risk assessment and risk reduction; ANSI B11.19 addresses safeguarding methods and their performance. Requirements can vary by machine type and jurisdiction, so confirm the applicable edition and local rules with a qualified safety professional. A paperwork check alone is not enough. Measure the opening, reach distance, and stopping time; then verify that operators cannot reach the hazard during normal work.
The need is concrete. The U.S. Bureau of Labor Statistics recorded 738 fatal work injuries involving contact with objects and equipment in 2022; that broad category is not limited to machine-guarding incidents. Still, it shows why hazard controls deserve careful review. A guard can look solid and still leave a hand-sized gap beside a feed chute. I have seen drawings make access seem simpler than it is on a crowded shop floor. Recheck the installed guard after setup changes, and document what was tested.
Start with a risk assessment, then check which standards and regulations apply in your jurisdiction. These references address risk reduction, guard design, safety distances, safeguard positioning, and safety-related control systems. Publication year is shown for reference only; it does not indicate importance or applicability. Check for amendments, national adoptions, and current legal requirements.
How to Choose the Right Machine Safety Guard
Select a Guard for the Machine and Work Process
Choose a guard by studying the task, not just the machine’s shape. Watch how operators load parts, clear jams, clean surfaces, and remove finished products. A fixed guard may suit a process with little routine access. Where frequent access is necessary, an interlocked guard can stop hazardous motion when opened. Fit matters. A guard that blocks sightlines or makes routine work awkward may invite workarounds.
OSHA’s machine-guarding standard, 29 CFR 1910.212, identifies hazards such as points of operation, rotating parts, and flying chips. Use that framework to check where hands, clothing, or tools could reach during real work. Also consider the process: a press, a conveyor, and a cutting station create different access and ejection risks. Keep openings small enough to prevent reach-in, while allowing safe loading and cleaning. Test the design with operators; a paper assessment can miss a stubborn jam point.
The U.S. Bureau of Labor Statistics reported 738 fatal work injuries involving contact with objects and equipment in 2023. This broad category is not limited to machines, but it underscores why exposure deserves careful review. Check guarding during normal operation and maintenance, then revisit it after process changes. The awkward detail matters: a guard can be technically present yet poorly matched to the work. Reassess. A little friction in the workflow may be safer than easy access to a moving part, but too much friction can also encourage unsafe shortcuts.
| Machine or Work Process | Typical Hazard | Guarding Approach to Consider | Work Process and Access Needs | Key Selection Checks |
|---|---|---|---|---|
| Power press or stamping operation | Crushing or amputation at the point of operation; unexpected cycling | Fixed or interlocked barrier guarding, or a properly designed presence-sensing safeguard where suitable for the operation | Consider how often dies are changed, parts are loaded, and jams are cleared. Safeguards must not be bypassed during routine work. | Verify stopping performance, safeguarding distance, control reliability, and safe setup and maintenance procedures. |
| Drill press or milling machine | Contact with rotating tools; flying chips or workpiece fragments | Adjustable or interlocked enclosure around the tool and work area; use suitable screens for chip containment | Allow visibility and access for tool changes and workpiece setup while keeping hands away from hazardous motion. | Ensure the guard stays in position, does not obstruct the task, and is secured or interlocked when access exposes a hazard. |
| Conveyor with accessible nip points | Entanglement or crushing at rollers, pulleys, and belt pinch points | Fixed guards at hazardous nip points; interlocked access gates where frequent entry is necessary | Plan for inspection, cleaning, and jam clearing. Provide safe isolation before workers enter or reach into hazardous areas. | Cover reachable danger points without creating new trapping hazards; locate emergency stops where workers can reach them. |
| Rotating shaft, coupling, or fan | Entanglement, impact, or contact with rotating parts | Fixed enclosure or barrier guard; use an interlocked guard if routine access is necessary | Determine whether access is needed during production or only for maintenance. Avoid openings that allow contact with moving parts. | Check guard strength, attachment, opening size, and clearance from moving components. |
| Robotic cell or automated machine | Impact, crushing, or trapping within the robot's operating envelope | Perimeter fencing with interlocked access gates; additional presence-sensing devices may be appropriate for specific access points | Map operating and maintenance access, including loading stations and recovery tasks. Define safe entry and restart procedures. | Assess the full cell, stopping behavior, access points, and any risks from stored or unexpected energy. |
| Grinding or abrasive-wheel operation | Wheel breakage, sparks, abrasive particles, and contact with the wheel | Wheel guard designed for the machine, supplemented by an adjustable work rest or suitable transparent screen where appropriate | Allow workpiece handling and inspection without removing or defeating the wheel guard. | Use a guard suited to the wheel and machine; inspect for damage and maintain the required work-rest clearance. |
| Manual feeding or ejection process | Hand entry into a cutting, shearing, or crushing zone | Fixed or interlocked barrier, or a suitable feeding or ejection device that keeps hands outside the danger zone | Match the safeguard to the material, production rate, and normal hand positions. Include safe methods for irregular workpieces. | Confirm that the safeguard prevents access during hazardous motion and does not introduce additional pinch or ergonomic risks. |
Selection note: Choose guarding based on a documented risk assessment of the machine, task, and foreseeable access. Guards should prevent access to hazards, remain securely attached when required, and not create additional hazards. Confirm applicable regulations and standards for the installation, and use energy isolation procedures for servicing when required.
A machine guard is only useful if it fits the task, the machine, and the people working nearby. Before installation, map the operator’s movements, material flow, and routine cleaning points. Measure openings and reach distances at the actual machine, not from a drawing alone. Check that the guard does not block visibility, create a new pinch point, or prevent safe access for adjustment. Small gaps matter.
Plan installation during a shutdown, with the machine isolated according to site procedures. Confirm mounting surfaces are sound and fasteners can be reached for later checks. Where an interlocked access point is needed, verify that the device responds reliably and that the machine reaches a safe state when opened. Test the completed installation under controlled conditions. A rushed fit can look tidy but still leave awkward access or loose hardware.
Set inspection intervals based on use, vibration, impact, and the surrounding environment. At each check, look for cracked panels, bent mesh, loose fixings, damaged cables, and signs of bypassing or rubbing. Open and close movable sections; confirm they move freely and function as intended. Record defects and repairs, even small ones. They can reveal a pattern. Clean with methods that will not weaken the guard material, and replace damaged parts promptly. After a machine change or repeated adjustment, reassess the guard. I have seen a sound installation become unsuitable after nearby equipment shifted.


